How to Handle Epoxy Resins
Regardless of which Counterforce System you plan to use or are currently using, the way you handle the resins is the same. If the fibreglass backing board is prepared correctly you will get an incredibly strong bond between the two. Working in a clean dust free area helps.
The Epoxy Counterforce Systems are two-part systems that makes Counterforces when you mix Epoxy Resin and Hardener that then cures. The two substances are stored in different containers and are only mixed together when you’re ready to use. Our 1:1 mix ratio Epoxy Resin systems are available in two-chamber syringes, in 2 x 500g bottles and other bulk packaging. Other mix configurations are generally available in different packaging ratios e.g. 2:1 ratio products are available in 1kg and 500g set. The mixing ratio stated on the packaging of the products must always be followed, otherwise the resin mix will not cross link correctly causing a weak Counterforce and or a partially set Counterforce.
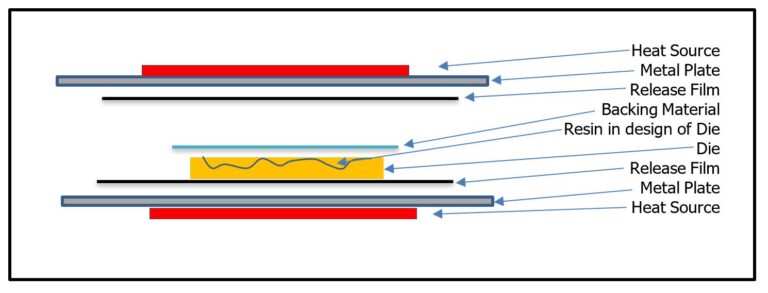
Once you mix the Epoxy Resin and Hardener to the correct proportions, the “Pot Life” begins. That is the time during which you have to degas the resin mix, pour the resin mix onto the die(s), place the sanded fibreglass backing board on top of the mixed resin. Then place the die with the resin mix and the backing board between 2 release paper or film sheets and then clamp between 2 thick Aluminium plates or in a Vulcanizing press. Under pressure, the surplus resin will be pushed out and then all the resin is heated to accelerate the curing process or wait till the material cures naturally.
The pot life varies on each Counterforce system and ranges from a few minutes to a few hours. If you are looking to cure the Epoxy Counterforce naturally then after the Pot Life / Gelling stage, the material needs several hours to 24 hours or more to fully cure and reach maximum strength. Always read the curing information on the product label and or Instructions of Use or the Instruction manual.
Epoxy based Counterforces are highly versatile and extremely strong, making it perfect for long life Counterforces especially the 1:1 mix ratio materials. The percentage of hardener is the critical element in a good Epoxy Counterforce System. As the ratio reduces from 1:1, the material strength reduces and so does the cost. The smaller the percentage of hardener the weaker and cheaper the cost of the Epoxy System. As the resin mix becomes weaker you are more likely to experience the following:
Cracking
Less durable
Delamination
Shorter run live due to wear
Easier to damage on the press during setup
Weaker bond to the Fibreglass Backing Board
More……
Epoxy Counterforces can also be can sanded, drilled and machines. This makes the epoxy system much more flexible over other types of systems.
Watch our video on how to correctly mix Epoxy on www.uemboss.com
General Precautions:
Note: Please wear suitable PPE (Personal Protective Equipment)
- Suitable eye protection (Goggle, Visor etc)
- Gloves (3 different pairs of gloves for sanding, mixing Epoxy and for use on heat Press)
- Suitable Apron and or Coat
- Dust and Vapour extraction
- Suitable Cap (to prevent Fibreglass Dust and Epoxy Vapour getting to your hair)
- Cleaning materials
- Clean working environment
- Space to work safely and comfortably
- Easy access to required tools and machinery
Always store Twin Barrel Syringes upright with the tip pointing down so they done leak
General Instructions of using a Twin Barrel Syringe:
Spray or apply a suitable release agent on the Die first ensuring the design is well coated.
Roughen the surfaces of the fibreglass board with 60 grit sandpaper or use a detail sander. Ensure you have removed all traces of dust, grease, oils and dirt from the Fibreglass board.
Cut the end tips of the Twin Barrel Syringe. Turn the syringe tip pointing up for a minute or so and then depress the syringe slightly, pushing the air bubbles to the top and out. If a static mixer is available then attach it now.
If using a Static Mixer, dispense the premix Epoxy Resin directly on to the Die by pushing the double plunger to dispense equal parts of the resin and hardener, in the engraved or etched design. If not using a static mixer then dispense the Epoxy and Hardener into a disposable paper or plastic cup, by pushing the double plunger to dispense equal parts of the resin and hardener.
Once dispensed, retract the plunger slightly, wipe the application tip clean, and replace the cap.
Quickly mix the resin and hardener until the resin and hardener are completely blended together (1-2 minutes). Degas mixed resin if possible or preheat the die to between 40 to 50°C / 105 to 120°F and then Pour or apply the premixed resin in the image area of the die. The heat will help reduce the viscosity of the premixed resin and help release the trapped air bubbles.
Place the sanded side of the fibreglass board onto the epoxy (See information on Laying Backing Materials) and Clamp to cure. Please note that a release film or paper must be under the Die and over the Fibreglass board to prevent access epoxy material from sticking to the clamping jigs or press platens.
Where available, twin barrel syringes can have static nozzles that will pre-mixes the resin and hardener as it dispenses the resin mix onto the die. This nozzles are for use once only and have to be discarded once used. The mixed resin within the nozzle will start gelling as the material approaches the Gel Time / Pot Life. Static nozzles are ideal as they reduce and or prevent mess and also prevents / reduces bubbles being created within the resin during mixing.
How to Remove Epoxy
Epoxy Resin is very durable and is designed to last, so we recommend you avoid getting the material on anything other than on the metal die . If you do end up with resin on other surfaces, then follow the below tips/recommendations.
Removing Cured Epoxy Resin:
If the Epoxy Resin has dried and hardened, on a surface where a suitable release agent wasn’t applied then we recommend you use a suitable solvent to soften to remove it. We recommend your try a Paint thinner, denatured alcohol, or adhesive remover as these products will help soften the epoxy. Just dip a cloth in the solvent and rub at the epoxy you want to remove. Avoid skin contact and work in a ventilated area.
Removing Uncured Epoxy Resin:
Uncured Epoxy Resin and or Hardener is softer, and therefore easier to remove than cured Epoxy. Simple acetone or isopropyl alcohol should remove it. Just apply the solvent to a cloth and rub the area until the resin and or hardener comes off.
Removing Epoxy Resin From Skin:
If you get Epoxy Resin and or Hardener on your skin, you should remove it as quickly as possible. For a more natural approach, try using vinegar. Simply saturate a cotton ball and rub the area until it softens. You can also try nail polish remover which has a small amount of acetone.
You can speed up the cure time for Epoxy Resin by applying heat.