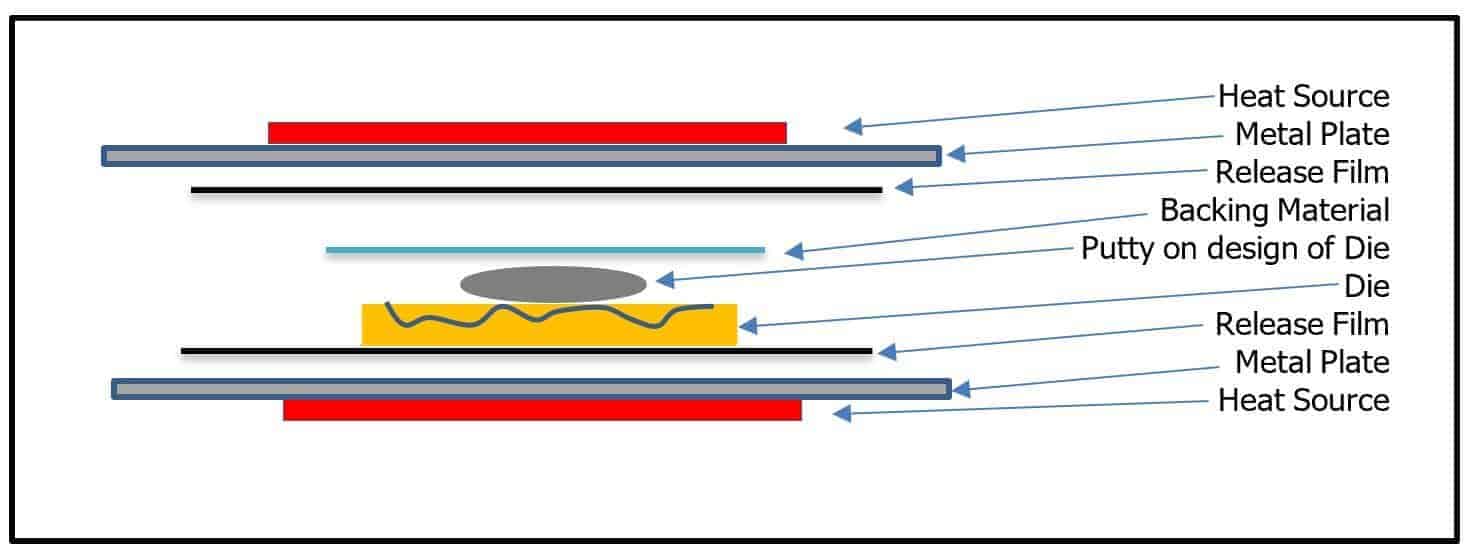
Making Embossing Counterforces using 2 Part Putty

Negatives for Trident Photopolymer Plates There are a number of different ways to make negatives for Photopolymer plate but we only recommend photographic negatives. This data sheet will explain the reasons why we only recommend these types of negatives. Typical methods of making negatives: 1. Laser Negative.2. Inkjet Negative.3. Laser Foil Negative.4. Photographic Negative.4a. Image…
Why use our technology to bring Counterforce making In-House? We have been involved in the manufacture and supply of materials for counterforce making for many decades. Over that period of time we have developed a knowledge base of information to help our existing and future customers manufacture counterforces in-house. We supply Premium Quality Engraving equipment,…
Regardless of which Counterforce System you plan to use or are currently using, the way you handle the resins is the same. If the fibreglass backing board is prepared correctly you will get an incredibly strong bond between the two. Working in a clean dust free area helps. The Epoxy Counterforce Systems are two-part systems…
Epoxy Crystallization All Epoxy resins, under certain conditions, can become solid or have a slush like appearance. This is called crystallization and it is where some component parts of the epoxy resin form a crystal-like structure. The crystallization of an epoxy is completely normal and is very similar to water freezing in that it goes…
The uEmboss DVC Counterforce Resin Degassing Vacuum Chamber is an essential piece of equipment for any company wanting to produce or are producing counterforces. Produce bubble free counterforces by de-aerating embossing resin. A quick and effective system that is a must for every counterforce making facility. Low maintenance system. Cylinder chamber made of stainless-steel. Powerful…
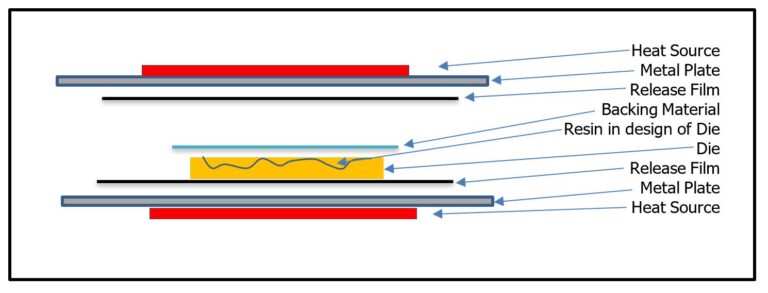
How to make Embossing Counterforce using 2-Part Resin Systems Process of making Embossing Counterforces: First make or order in your Die. Your Die can be made using our Embossing grade photopolymer Plate or an etched, hand chiseled or a CNC engraved metal Die. Place a sheet of suitable oversized Release Film or Paper on the…
No products in the cart.